Getting Started with Kind Clusters
Introduction
This guide will walk you through successfully registering your kind clusters with the KubeSlice Controller and creating a slice across the clusters. We have worked to make this experience as seamless as possible. If you have any comments, questions, or issues, please feel free to join our community.
The following sections help you to:
- Install the KubeSlice Controller on the controller cluster
- Register the worker clusters on the controller cluster and install the Slice Operator (Worker Operator) on the worker clusters
- Create a slice
- Test the connectivity between the worker clusters using the iPerf tool
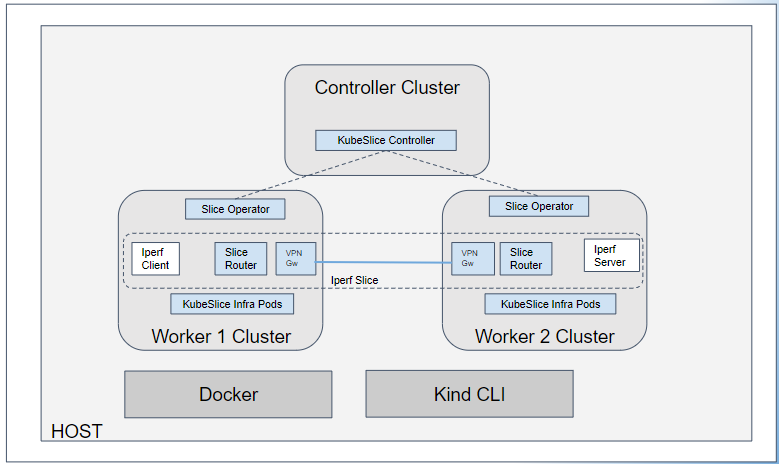
The following diagram shows the topology of KubeSlice installed on kind clusters.
Prerequisites
Ensure that you have the following environment set up that is required to install KubeSlice. In this environment, you must install the KubeSlice Controller and register clusters with it.
Command Line Tools
You need the following command line tools to install KubeSlice.
| Package Required | Installation Instructions |
|---|---|
| Helm - The Package Manager for Kubernetes | https://helm.sh/docs/intro/install/ |
| kubectl - Kubernetes CLI | https://kubernetes.io/docs/tasks/tools/ |
| kubectx and kubens | https://github.com/ahmetb/kubectx#Installation |
| Docker | https://docs.docker.com/engine/install/ |
| Kind CLI | https://kind.sigs.k8s.io/docs/user/quick-start/#installation |
Infrastructure Requirements
The following are the infrastructure requirements to install KubeSlice components.
If you are on Ubuntu OS, then it is recommended to increase the ulimit
to 2048 or unlimited.
| Host Requirements | Minimum of 8vCPUs and 8GB of RAM |
Ensure to modify the memory and CPU usage allowed to docker as described in
https://docs.docker.com/desktop/windows/#resources.
Requirements for Hosting KubeSlice Controller
You can install the KubeSlice Controller on a cluster and also register the same cluster with the KubeSlice Controller.
| Cluster Requirements | 1 Kubernetes Cluster |
| Supported Kubernetes Versions | 1.21 and 1.22 |
| Required Helm Version | 3.7.0 |
Requirements for Worker Clusters
| Minimum Clusters Required | 2 Kubernetes Clusters |
| Nodes Reserved for KubeSlice Components] | 1 Node per cluster |
| Supported Kubernetes Versions | 1.21 and 1.22 |
| Required Helm Version | 3.7.0 |
Cluster Context Switching
You must change your kubeconfig context frequently to run
kubectl commands in each cluster. Using kubectx can make this
process easier and save you time.
To switch the context to a certain cluster, run the following command with the corresponding cluster name:
kubectx <cluster name>
Expected Output
Switched to context "<cluster name>"
To return to the last used context, use the following command:
kubectx -
Expected Output
Switched to context "<previous context>"
Preparing the Controller Cluster for Registration
Create a YAML file to prepare the controller cluster for registration by using the following template:
The networking property is required for the namespace isolation
feature. By default, the kind cluster has the kindnet CNI setting, but it needs to be
disabled for the namespace isolation feature to work. We install Calico instead for the
CNI network.
To understand more about the configuration parameters, see kind – Configuration.
If you face memory issues with a two-nodes kind cluster, then use a single-node kind cluster.
kind: Cluster
apiVersion: kind.x-k8s.io/v1alpha4
networking:
  # WARNING: It is _strongly_ recommended that you keep this the default
  # (127.0.0.1) for security reasons. However it is possible to change this.
  apiServerAddress: "127.0.0.1"
  # By default the API server listens on a random open port.
  # You may choose a specific port but probably don't need to in most cases.
  # Using a random port makes it easier to spin up multiple clusters.
  apiServerPort: 6443
  # By default kind takes kindnet CNI but we are disabling this to use netpol feature
  disableDefaultCNI: true # disable kindnet
  podSubnet: 192.168.0.0/16 # set to Calico's default subnet
nodes:
  - role: control-plane
    image: kindest/node:v1.21.10@sha256:84709f09756ba4f863769bdcabe5edafc2ada72d3c8c44d6515fc581b66b029c
  - role: worker
    image: kindest/node:v1.21.10@sha256:84709f09756ba4f863769bdcabe5edafc2ada72d3c8c44d6515fc581b66b029c
    kubeadmConfigPatches:
      - |
        kind: JoinConfiguration
        nodeRegistration:
          kubeletExtraArgs:
            node-labels: "kubeslice.io/node-type=gateway"
Use the following template to create a single-node controller cluster.
kind: Cluster
apiVersion: kind.x-k8s.io/v1alpha4
networking:
 # WARNING: It is _strongly_ recommended that you keep this the default
 # (127.0.0.1) for security reasons. However it is possible to change this.
 apiServerAddress: "127.0.0.1"
 # By default the API server listens on a random open port.
 # You may choose a specific port but probably don't need to in most cases.
 # Using a random port makes it easier to spin up multiple clusters.
 apiServerPort: 6443
 # By default kind takes kindnet CNI but we are disabling this to use netpol feature
 disableDefaultCNI: true # disable kindnet
 podSubnet: 192.168.0.0/16 # set to Calico's default subnet
nodes:
 - role: control-plane
   image: kindest/node:v1.21.10@sha256:84709f09756ba4f863769bdcabe5edafc2ada72d3c8c44d6515fc581b66b029c
   kubeadmConfigPatches:
     - |
       kind: InitConfiguration
       nodeRegistration:
         kubeletExtraArgs:
           node-labels: "kubeslice.io/node-type=gateway"
Applying the YAML File to Create the Controller Cluster
Apply the YAML File to create the controller cluster by running this command:
kind create cluster --name <Controller-Cluster-Name> --config kind-controller-cluster.yaml
Preparing the Worker Cluster for Registration
Create a YAML file to prepare the worker cluster for registration by using the following template:
The networking property is required for the namespace isolation
feature. By default, the kind cluster has the kindnet CNI setting, but it needs to be
disabled for the namespace isolation feature to work. We install Calico instead for the
CNI network.
To understand more about the configuration parameters, see kind – Configuration.
If you face memory issues with a two-nodes kind cluster, then use a single-node kind cluster.
kind: Cluster
apiVersion: kind.x-k8s.io/v1alpha4
networking:
  # By default kind takes kindnet CNI but we are disabling this to use netpol feature
  disableDefaultCNI: true # disable kindnet
  podSubnet: 192.168.0.0/16 # set to Calico's default subnet
nodes:
  - role: control-plane
    image: kindest/node:v1.21.10@sha256:84709f09756ba4f863769bdcabe5edafc2ada72d3c8c44d6515fc581b66b029c
  - role: worker
    image: kindest/node:v1.21.10@sha256:84709f09756ba4f863769bdcabe5edafc2ada72d3c8c44d6515fc581b66b029c
    kubeadmConfigPatches:
      - |
        kind: JoinConfiguration
        nodeRegistration:
          kubeletExtraArgs:
            node-labels: "kubeslice.io/node-type=gateway"
Use the following template to create a single-node worker cluster.
kind: Cluster
apiVersion: kind.x-k8s.io/v1alpha4
networking:
  # By default kind takes kindnet CNI but we are disabling this to use netpol feature
  disableDefaultCNI: true # disable kindnet
  podSubnet: 192.168.0.0/16 # set to Calico's default subnet
nodes:
  - role: control-plane
    image: kindest/node:v1.21.10@sha256:84709f09756ba4f863769bdcabe5edafc2ada72d3c8c44d6515fc581b66b029c
    kubeadmConfigPatches:
      - |
        kind: InitConfiguration
        nodeRegistration:
          kubeletExtraArgs:
            node-labels: "kubeslice.io/node-type=gateway"
Applying the YAML File to Create the Worker Cluster
Apply the YAML File to create the worker cluster by running this command:
For worker cluster 1
kind create cluster --name <Worker-Cluster-Name-1> --config kind-Worker-cluster.yaml
For worker cluster 2
kind create cluster --name <Worker-Cluster-Name-2> --config kind-Worker-cluster.yaml
Installing Calico Networking and Network Security
Install Calico to provide networking and network security for kind clusters.
Install Calico only after creating the clusters.
To install Calico on a kind cluster:
- Install the operator on your cluster by using the following command:
kubectl create -f https://projectcalico.docs.tigera.io/manifests/tigera-operator.yaml
- Download the custom resources required to configure Calico by using the following command:
curl https://projectcalico.docs.tigera.io/manifests/custom-resources.yaml -O
Running the above command downloads a file, which contains the following content.
# This section includes base Calico installation configuration.
# For more information, see: https://projectcalico.docs.tigera.io/v3.23/reference/installation/api#operator.tigera.io/v1.Installation
apiVersion: operator.tigera.io/v1
kind: Installation
metadata:
  name: default
spec:
  # Configures Calico networking.
  calicoNetwork:
    # Note: The ipPools section cannot be modified post-install.
    ipPools:
    - blockSize: 26
      cidr: 192.168.0.0/16
      encapsulation: VXLANCrossSubnet
      natOutgoing: Enabled
      nodeSelector: all()

---

# This section configures the Calico API server.
# For more information, see: https://projectcalico.docs.tigera.io/v3.23/reference/installation/api#operator.tigera.io/v1.APIServer
apiVersion: operator.tigera.io/v1
kind: APIServer
metadata:
  name: default
spec: {}
- Create the manifest to install Calico by using the following command:
kubectl create -f custom-resources.yaml
- Validate namespaces related to Calico by using the following command:
kubectl get ns
Expected Output
NAME                   STATUS   AGE
calico-apiserver       Active   3d
calico-system          Active   3d
default                Active   3d
kube-node-lease        Active   3d
kube-public            Active   3d
kube-system            Active   3d
local-path-storage     Active   3d
tigera-operator        Active   3d
- Validate the Calico pods by using the following command:
kubectl get pods -n calico-system
Expected Output
NAME                                       READY   STATUS    RESTARTS   AGE
calico-kube-controllers-59f859b79d-vbmqh   1/1     Running   1          30s
calico-node-nq7sp                          1/1     Running   0          30s
calico-node-rhw7h                          1/1     Running   0          30s
calico-node-tfqzp                          1/1     Running   0          30s
calico-typha-8b888f7d8-fx62t               1/1     Running   0          30s
calico-typha-8b888f7d8-vnb67               1/1     Running   0          30s
Calico networking is installed successfully.
Adding the Helm Repo
Add the KubeSlice helm repo in your machine where kind clusters are running using the following commands:
helm repo add kubeslice https://kubeslice.github.io/kubeslice/
helm repo update
Validating the Helm Repo
Validate the helm repo by using the following command:
helm search repo kubeslice
Expected Output
NAME                            CHART VERSION   APP VERSION     DESCRIPTION
kubeslice/cert-manager          v1.7.0          v1.7.0          A Helm chart for cert-manager
kubeslice/istio-base            1.13.3          1.13.3          Helm chart for deploying Istio cluster resource...
kubeslice/istio-discovery       1.13.3          1.13.3          Helm chart for istio control plane
kubeslice/kubeslice-controller  0.3.0           0.5.1           A Helm chart for kubeslice-controller
kubeslice/kubeslice-worker      0.3.0           0.10.0          KubeSlice Operator
Installing the KubeSlice Controller
The KubeSlice Controller orchestrates the creation and management of slices on worker clusters. The KubeSlice Controller components and the worker cluster components can coexist on a cluster. Hence, the cluster running the KubeSlice Controller can also be used as a worker cluster. We recommend that you run the KubeSlice Controller on a separate cluster.
This following section describes the steps to install the KubeSlice Controller in a cluster.
The kind cluster deployment is only supported with a single host and it does not support connectivity to the cloud clusters.
Installing the KubeSlice Controller on a cluster installs the following:
- KubeSlice Controller specific ClusterResourceDefinitions (CRDs)
- ClusterRole, ServiceAccount and ClusterRoleBinding for KubeSlice Controller
- A Role and RoleBinding for KubeSlice Controller Leader Election
- KubeSlice Controller workload
- Kubernetes Dashboard
- KubeSlice Controller API Gateway
Only the cluster administrator can install the KubeSlice Controller.
Prerequisites for KubeSlice Controller
Before you begin, ensure the following prerequisites are met:
- You have set up the environment to install the KubeSlice Controller in the cluster. For more information, see Prerequisites.
- You have cluster administrator privileges to install the KubeSlice Controller.
- You have added the helm repository to your local configuration. For more information, see Adding the Helm Repo.
Installing the Certificate Manager
The KubeSlice Controller uses the certificate manager to provision the certificates for the webhook server. The certificate manager uses the Kubernetes API server that is extended using a webhook server for providing dynamic admission control over the certificate manager resources. This implies that the certificate manager benefits from the same behaviour as the basic Kubernetes resources.
Switch the context to the controller cluster using the following command:
kubectx <cluster name>
Install the cert-manager using the following command:
helm install cert-manager kubeslice/cert-manager --namespace cert-manager --create-namespace --set installCRDs=true
Validating the Certificate Manager
Verify if the pods are running on the controller cluster by running the following command:
kubectl get pods -n cert-manager
Expected Output
NAME                                       READY   STATUS    RESTARTS   AGE
cert-manager-847544bbd-tfznw               1/1     Running   0          45s
cert-manager-cainjector-5c747645bf-2dg9r   1/1     Running   0          45s
cert-manager-webhook-5949b8dd88-tvplz      1/1     Running   0          45s
Retrieve the controller cluster Control Plane IP (endpoint) by running the following command:
kubectl get nodes -o wide
Expected Output
NAME                            STATUS   ROLES                  AGE   VERSION    INTERNAL-IP   EXTERNAL-IP   OS-IMAGE       KERNEL-VERSION   CONTAINER-RUNTIME
kind-controller-control-plane   Ready    control-plane,master   74m   v1.20.15   172.18.0.3    <none>        Ubuntu 21.10   5.4.0-1071-aws   containerd://1.5.10
Creating the Controller YAML File
To understand more about the configuration parameters, see Controller Configuration Parameters.
Create thevalues.yaml file for the KubeSlice Controller.
Use the kubectl get nodes -o wide | grep master | awk '{ print $6 }' command
to get the control plane IP address.
The grep and awk commands do not work on Windows. Use Gitbash to use
grep and awk commands if you are on Windows.
kubeslice:
  controller:
    loglevel: info
    rbacResourcePrefix: kubeslice-rbac
    projectnsPrefix: kubeslice
    endpoint: <internal IP address of the Kubernetes control plane node> # https://<INTERNAL IP>:6443
Applying the Controller YAML File
Apply the KubeSlice Controller YAML file by using the following command:
helm install kubeslice-controller kubeslice/kubeslice-controller -f <full path of the config yaml file> --namespace kubeslice-controller --create-namespace
Expected Output
NAME: kubeslice-controller
LAST DEPLOYED: Fri Jun 10 18:42:23 2022
NAMESPACE: kubeslice-controller
STATUS: deployed
REVISION: 1
TEST SUITE: None
NOTES:
kubeslice controller installation successful!
Validating the Controller Installation
Perform these steps to validate the installation on the controller cluster where the KubeSlice Controller is installed:
Validate the installation of the KubeSlice Controller by checking the
pods that belong to the kubeslice-controller namespace using the
following command:
kubectl get pods -n kubeslice-controller
Expected Output
NAME                                            READY   STATUS      RESTARTS   AGE
kubeslice-controller-manager-64c9d599d6-qjst4   2/2   Running       0          14s
Creating a Project Namespace
A project may represent an individual customer or an organization or a department within an organization. Each project would have a dedicated auto-generated namespace, which will ensure that the resources of one project do not clash with the resources of another project.
For example, a slice with the same name can exist across multiple projects but with different configurations. Changes to the slice in one project will not affect the slice in another project.
Creating a Project YAML File
Create a project.yaml file for the project namespace.
To understand more about the configuration parameters, see Project Namespace Configuration Parameters.
apiVersion: controller.kubeslice.io/v1alpha1
kind: Project
metadata:
  name: avesha
  namespace: kubeslice-controller
spec:
  serviceAccount:
    readOnly:
      - <readonly user1>
      - <readonly user2>
      - <readonly user3>
    readWrite:
      - <readwrite user1>
      - <readwrite user2>
      - <readwrite user3>
Applying the Project YAML File
Apply the project in the controller cluster by running the following command:
kubectl apply -f project.yaml -n kubeslice-controller
Validating the Project
Check the project by using the following command:
kubectl get project -n kubeslice-controller
Expected Output
NAME     AGE
avesha   30s
Registering the Worker Clusters
Before creating a slice across your Kubernetes clusters, you must register your worker clusters with the KubeSlice Controller.
Switch context to the controller cluster by using the following command:
kubectx <cluster name>
Creating the Cluster Registration YAML File
Create the cluster-reg.yamlfile for registering the worker cluster using the following
template.
To understand more about the configuration parameters, see Cluster Registration Configuration Parameters.
apiVersion: controller.kubeslice.io/v1alpha1
kind: Cluster
metadata:
  name: <first-worker-cluster-name>  # kind-worker-1
  namespace: kubeslice-<project name> # kubeslice-avesha
spec:
  networkInterface: eth0
---
apiVersion: controller.kubeslice.io/v1alpha1
kind: Cluster
metadata:
  name: <second-worker-cluster-name> # kind-worker-2
  namespace: kubeslice-<project name> # kubeslice-avesha
spec:
  networkInterface: eth0
Applying the Cluster Registration YAML File
Apply the cluster-reg.yaml file by using the following command:
kubectl apply -f cluster-reg.yaml -n kubeslice-<project name>
Validating the Registered Clusters
Validate the registered clusters by using the following command:
kubectl get clusters -n kubeslice-<project name>
Example
kubectl get clusters -n kubeslice-avesha
Expected Output
NAME           AGE
kind-worker-1  51s
kind-worker-2  51s
Installing the Slice Operator
After registering the worker cluster with the KubeSlice Controller, you must install the Slice Operator in your worker cluster.
To install the Slice Operator, get the secrets for the worker cluster from the KubeSlice Controller manually. Use these secrets in your values .yaml file to install the Slice Operator.
Alternatively, you can use the script to create your values.yaml file as described in Script to Get the Secrets of the Worker Cluster.
Getting the Secrets of the Registered Cluster from the Controller Cluster
After registering the worker cluster with the KubeSlice Controller, a secret gets listed under the Project namespace. The secret contains access information that you must add in the Slice Operator YAML file. The secret is required for the worker cluster to communicate with the KubeSlice Controller.
You can also retrieve the secrets of the worker clusters using these scripts.
To get the secrets:
-
Get the list of secrets belonging to the project namespace using the following command:
kubectl get secrets -n kubeslice-<project name>Example
kubectl get secrets -n kubeslice-aveshaExample Output
NAME                                              TYPE                                  DATA   AGE
default-token-mzh9h                               kubernetes.io/service-account-token   3      30s
kubeslice-rbac-rw-user-token-lf4zg                kubernetes.io/service-account-token   3      30s
kubeslice-rbac-worker-kind-worker-1-token-mw9vp   kubernetes.io/service-account-token   5      30s
kubeslice-rbac-worker-kind-worker-2-token-pksp5   kubernetes.io/service-account-token   5      30s
The name of the secret is in this format:
kubeslice-rbac-<registered cluster secret name>-token.For example,kubeslice-rbac-worker-kind-worker-1-token-mw9vp- this secret is meant for a worker cluster that was registered using the name kind-worker-1. -
Retrieve the details of the secret using the following command:
kubectl get secrets <worker-cluster-secret-name> -o yaml -n kubeslice-<projectname>
Creating the Slice Operator YAML File
Create theslice-operator.yaml file using the following template.
To understand more about the configuration parameters, see Slice Operator Configuration Parameters.
## Base64 encoded secret values from the controller cluster
controllerSecret:
  namespace: <namespace from secrets>
  endpoint: <base64 of (https://<kind-controller-control-plane-nodeip>:6443)>
  ca.crt: <ca.crt from secrets>
  token: <token from secrets>

cluster:
  name: <worker-cluster-name> # kind-worker-1
  nodeIp: <worker-cluster-nodeip> # 172.18.0.6
Get the Node IPs of Worker Clusters
Switch the context to the worker cluster.
kubectx <cluster name>
Retrieve the node IP of the worker cluster by running the following command:
The grep and awk commands do not work on Windows. Use Gitbash to use
grep and awk commands if you are on Windows.
kubectl get nodes -o wide | grep master | awk '{ print $6 }'
Expected Output
172.18.0.6
Example of the Slice Operator YAML file
## Base64 encoded secret values from controller cluster
controllerSecret:
  namespace: a3ViZXNsaWNlLWF2ZXNoYQ==
  endpoint: aHR0cHM6Ly8xNzIuMTguMC4zOjY0NDM=
  ca.crt: LS0tLS1CRUdJTiBDRVJUSUZJQ0FURS0tLS0tCk1JSUM1ekNDQWMrZ0F3SUJBZ0lCQURBTkJna3Foa2lHOXcwQkFRc0ZBREFWTVJNd0VRWURWUVFERXdwcmRXSmwKY201bGRHVnpNQjRYRFRJeU1EVXlNekE1TkRBeU5Wb1hEVE15TURVeU1EQTVOREF5TlZvd0ZURVRNQkVHQTFVRQpBeE1LYTNWaVpYSnVaWFJsY3pDQ0FTSXdEUVlKS29aSWh2Y05BUUVCQlFBRGdnRVBBRENDQVFvQ2dnRUJBSjBwClh6MloxYXBNeXdGV1d0ek8wdnMvNHA0a0xQeVUyamF1blhiSmhhUDdwbytWRXIrcHB4cDMyNlBFMDdYTVBGYkkKY0hLWFdGUU1sSWRXK256UHRDYTMzdGRLdlRtYzZHR1k5bnJNeTBaRW1wcnd6Kzc1RmpXcE1lcXdROExHZnYzeQpoZlNqdmRSQ3JTSC9WMUlTUkxJc1VVcVlNeVJLYWZXWmMyRHpwM1RsS2M1d0UwWk5ldW5vMDRDRUttc0p5WmlPCkZVeXB4S05RbGdNd0hBdUZIWGVBSnMxbWhubDNYbHpRUlduRzFnZDBvTW5pZEsyUzhJSy9vZVk1OVVkaU5UV1EKdzMwa1JJWVZPOWE1S1B4aFhjMWtUQlhqQVlKL2dlZldNb1NYK3dnbnl2YWQyaUdvZWlnc0FJNVc1NGJVY2E2YQpnMUdlbnBvOENrZUdIQUNZVzdFQ0F3RUFBYU5DTUVBd0RnWURWUjBQQVFIL0JBUURBZ0trTUE4R0ExVWRFd0VCCi93UUZNQU1CQWY4d0hRWURWUjBPQkJZRUZGSGVwbEVYNDA5RWR6RFRsQVlzUHV5TCtkdWtNQTBHQ1NxR1NJYjMKRFFFQkN3VUFBNElCQVFBMjhEUW54OEpHc1JJUGE4bENzSmxKa25ialVDVm9xQnhxNkMrelRhZm5PUXFFS1VVWQp6YlRjNjhxeDFLYVdQdzVEeXQzQWNERWZmTnUwbFNzekwrUy8rcDRUc0V1dVl0bzVuRFEwTkxrek5Qd0JrT2krCjFnRkxJNmZ4NnlSbGhNS0YrVG9zWnZObXRsc2J0bVUvWWRxWG5mdE1ya2tiNTFGdVhTUHNDeXU1eERLejZ6WEEKa2I5dWVpRE8xS2ZWVG4xZm5Ec3VuWmdraUJGZ05WZkdwcHlPWDZlbVVmcHgrVWhVeTJhZkljSTlWRE0rdWY5cQpDYVl4NTN5UzR4amErbk5OS1RJbnhkd0JGeTJ3ekdrZVFiVXVKeDBmdnhGdTRzeDFtRmRkQ1JTMUl4SzVDcE05CmphZHBTSUNWU3k3ZHJ6NzQ0cnV1VGZhZjlHeTJHY3p6ajJwSgotLS0tLUVORCBDRVJUSUZJQ0FURS0tLS0tCg==
  token: ZXlKaGJHY2lPaUpTVXpJMU5pSXNJbXRwWkNJNkltZHdhRGx0U1djM04yb3pPRUl5WlUxd01VUlBjamMxUTJSTFJXdGlTMWRaY21KWWIxQTBSSGd4ZWxVaWZRLmV5SnBjM01pT2lKcmRXSmxjbTVsZEdWekwzTmxjblpwWTJWaFkyTnZkVzUwSWl3aWEzVmlaWEp1WlhSbGN5NXBieTl6WlhKMmFXTmxZV05qYjNWdWRDOXVZVzFsYzNCaFkyVWlPaUpyZFdKbGMyeHBZMlV0WVhabGMyaGhJaXdpYTNWaVpYSnVaWFJsY3k1cGJ5OXpaWEoyYVdObFlXTmpiM1Z1ZEM5elpXTnlaWFF1Ym1GdFpTSTZJbXQxWW1WemJHbGpaUzF5WW1GakxYZHZjbXRsY2kxM2IzSnJaWEl0TVMxMGIydGxiaTFyT0daMFp5SXNJbXQxWW1WeWJtVjBaWE11YVc4dmMyVnlkbWxqWldGalkyOTFiblF2YzJWeWRtbGpaUzFoWTJOdmRXNTBMbTVoYldVaU9pSnJkV0psYzJ4cFkyVXRjbUpoWXkxM2IzSnJaWEl0ZDI5eWEyVnlMVEVpTENKcmRXSmxjbTVsZEdWekxtbHZMM05sY25acFkyVmhZMk52ZFc1MEwzTmxjblpwWTJVdFlXTmpiM1Z1ZEM1MWFXUWlPaUl5WkRBNU5HTTNZeTAyTkRCbUxUUTFZVEl0WVdWak1DMDNaVGhpTkdGa09XUmxPRGNpTENKemRXSWlPaUp6ZVhOMFpXMDZjMlZ5ZG1salpXRmpZMjkxYm5RNmEzVmlaWE5zYVdObExXRjJaWE5vWVRwcmRXSmxjMnhwWTJVdGNtSmhZeTEzYjNKclpYSXRkMjl5YTJWeUxURWlmUS5nSmZzUWlGMjByeXRPaFpoQkVzTlNEUjl2cTdqUkg5amdoUkU3WllQbG9VUHV1VEJ2eHBYUW94V2xHcHlRMDVURXRlcGdSOUo1N3R6djFkTjNteTd5TVFSQmlUMWp4bld3UXhNV19QLUFPV01pSVpUeEZCUU04R0pMdVZDRFhqOXBudWpBTnFqMk8wWE5HQmliNlpEeWk1UGNmcEpzb1ZQT1Y2R2Uxcmt4UnRmeFplTkVyRDJOUmNtNG5oX2Z2d0ZoLWd3UW5yTEZoVUpvNVZyckFaNGwtSUlMbFhjZm03bnJBWTRoa19MWVpod2JLd2dLUWw4Qk1YVE8tcHRRSkJfczl0X3VFeExfaHlRRmthLTNwZzBSTjlIYWhzQWtQNlRKOUdTc0VWVVpJMmN6LWNkbVlzNDdaLWh6eHlpUnJyWEhwOE4xLUtUTXFtSTVlYXBPLUxnenc=

cluster:
  name: worker-1
  nodeIp: 172.18.0.7
Applying the Slice Operator Values File
The following information is required to apply the manifest file.
| Parameter | Description |
|---|---|
<values-file> | The file name that contains the configuration values. |
You must install the Slice Operator in the registered cluster.
Apply the slice configuration through the slice-operator.yaml to the worker cluster by
using the following command:
helm install kubeslice-worker kubeslice/kubeslice-worker -f <full path of slice-operator.yaml> --namespace kubeslice-system --create-namespace
Validating the Slice Operator Installation
To validate the Slice Operator installation in the registered cluster,
check the pods belonging to the namespace kubeslice-system by using
the following command:
kubectl get pods -n kubeslice-system
Expected Output
NAME                                                 READY   STATUS    RESTARTS   AGE
jaeger-65c6b7f5dd-597wv                              1/1     Running   0          40s
kubeslice-netop-xldst                                1/1     Running   0          40s
kubeslice-operator-7c64667fd4-cvmps                  2/2     Running   0          40s
mesh-dns-bf5d97cf5-lxlnr                             1/1     Running   0          40s
nsm-admission-webhook-bb4994c7d-x25rk                1/1     Running   0          40s
nsm-kernel-forwarder-99c6k                           1/1     Running   0          40s
nsm-kernel-forwarder-cx6fn                           1/1     Running   0          40s
nsmgr-blfvn                                          3/3     Running   0          40s
nsmgr-z2msg                                          3/3     Running   0          40s
prefix-service-76bd89c44f-pbrmn                      1/1     Running   0          40s
You must repeat the same sequence of steps that is getting secrets, creating the values .yaml file and applying it on each worker cluster to install the Slice Operator on other worker clusters.
You have successfully installed the Slice Operator in the worker cluster. Repeat the above steps to install the Slice Operator in all the worker clusters.
Creating a Slice
Create a slice in a single worker cluster or across worker clusters that are registered with the KubeSlice Controller.
Prerequisites
Before you begin, ensure the following prerequisites are met:
- You have the KubeSlice Controller installed on a separate cluster. For more information, see Installing the KubeSlice Controller.
- You have registered two or more worker clusters with the KubeSlice Controller.
Creating the Slice YAML File
After successfully registering the worker clusters with the KubeSlice Controller, create a slice to onboard your application namespaces. You can create a slice across the multiple clusters or intra-cluster.
Slice Configuration
Create the slice configuration .yaml file using the following template.
If you want to add a standard QoS profile configuration for multiple slices,
create a standard QoS profile.
Add the name of the external QoS profile as the value of standardQosProfileName in the slice configuration YAML file.
In a slice configuration YAML file, the standardQosProfileName parameter and the qosProfileDetails
object are mutually exclusive.
To understand more about the configuration parameters, see Slice Configuration Parameters.
apiVersion: controller.kubeslice.io/v1alpha1
kind: SliceConfig
metadata:
  name: <SLICENAME>   # water
  namespace: kubeslice-<project name>
spec:
  sliceSubnet: 10.1.0.0/16
  sliceType: Application
  sliceGatewayProvider:
    sliceGatewayType: OpenVPN
    sliceCaType: Local
  sliceIpamType: Local
  clusters:
    - <worker cluster 1> # kind-worker-1
    - <worker cluster 2> # kind-worker-2
  qosProfileDetails:
    queueType: HTB
    priority: 1
    tcType: BANDWIDTH_CONTROL
    bandwidthCeilingKbps: 5120
    bandwidthGuaranteedKbps: 2560
    dscpClass: AF11
  namespaceIsolationProfile:
    applicationNamespaces:
     - namespace: iperf
       clusters:
       - '*'
    isolationEnabled: false                   #make this true in case you want to enable isolation
    allowedNamespaces:
     - namespace: kube-system
       clusters:
       - '*'
Applying the Slice Configuration on the Controller Cluster
The following information is required to apply the slice configuration.
| Variable | Description |
|---|---|
<cluster name> | The name of the cluster. |
<slice configuration> | The name of the slice configuration file. |
<project name> | The project name on which you apply the slice configuration file. |
You must apply the slice configuration .yamlfile on the project name.
Switch context to the KubeSlice Controller using the following command:
kubectx <cluster name>
Run the following command to apply the YAML file on the project:
kubectl apply -f <slice-configuration>.yaml -n kubeslice-<project name>
You have successfully created a slice with the registered clusters. All the slice configuration are applied at the KubeSlice Controller level.
Creating a QoS Profile
The slice configuration file contains a QoS profile object. To apply a QoS profile to multiple slices, you can create a separate QOS profile YAML file and call it out in other slice configuration.
Validating the Slice
Validate the slice configuration on the controller and worker clusters.
Validating the Slice Configuration from the Controller Cluster
Validate the slice configuration from the controller cluster using the following command:
kubectl get sliceconfig -n kubeslice-<project name>
Expected Output
NAME    AGE
water   35s
Validate the slice configuration in the KubeSlice Controller using the following command:
kubectl get workersliceconfig -n kubeslice-<project name>
Example
kubectl get workerslicegateway -n kubeslice-avesha
Expected Output
NAME                                              AGE
water-dev-worker-cluster-1-dev-worker-cluster-2   45s
water-dev-worker-cluster-2-dev-worker-cluster-1   45s
Validating the Slice Configuration from the Worker Cluster
Validate the slice creation on the worker clusters using the following command on each worker cluster:
kubectl get slice -n kubslice-system
Example Output
NAME    AGE
water   45s
Validate the slice gateway on each worker cluster using the following command:
kubectl get slicegw -n kubeslice-system
Example Output
NAME                                SUBNET        REMOTE SUBNET   REMOTE CLUSTER   GW STATUS
water-kind-worker-1-kind-worker-2   10.1.1.0/24   10.1.2.0/24     kind-worker-2
Managing Namespaces
Namespaces that are created to run application deployments can be onboarded on a slice to form a micro network segment. To know more, see managing namespaces.
Isolating Namespaces
You can isolate namespaces in a slice by using the namespace isolation feature. To know more, see isolating namespaces.
Testing the Network Connectivity between the Worker Clusters
iPerf is a tool commonly used to measure network performance, perform network tuning, and more. The iPerf application consists of two main services, iperf-sleep (client) and iperf-server.
Prerequisites for using the iPerf Tool
To deploy a application, you must create a namespace for that application in both the client and server clusters before creating the slice.
Create the iperf namespace on the worker clusters identified as the
client and server using the following command:
kubectl create ns iperf
Deploying the iPerf Application
Deploy the iPerf application and test the network connectivity between the worker clusters.
You can also use an intra-cluster slice to test the intra cluster connectivity. To know more, see deploying the iPerf application on an intra-cluster slice.
Identify a worker cluster as a client and another worker cluster as a server and configure them to test the network connectivity.
To establish the connectivity between two worker clusters:
-
Switch context to the worker cluster identified as the client using the following command:
kubectx <cluster name> -
Onboard the existing
iperfnamespace to the slice. To know more, see onboarding namespaces.cautionEnsure that you have onboarded the iperf namespace. If you create a namespace after the slice creation, then you could face issues when you deploy the application as the namespace creation takes some time.
-
Create the
iperf-sleep.yamlusing the following template.apiVersion: apps/v1
kind: Deployment
metadata:
name: iperf-sleep
namespace: iperf
labels:
app: iperf-sleep
spec:
replicas: 1
selector:
matchLabels:
app: iperf-sleep
template:
metadata:
labels:
app: iperf-sleep
spec:
containers:
- name: iperf
image: mlabbe/iperf
imagePullPolicy: Always
command: ["/bin/sleep", "3650d"]
- name: sidecar
image: nicolaka/netshoot
imagePullPolicy: IfNotPresent
command: ["/bin/sleep", "3650d"]
securityContext:
capabilities:
add: ["NET_ADMIN"]
allowPrivilegeEscalation: true
privileged: true -
Apply the
iperf-sleep.yamlusing the following command:kubectl apply -f iperf-sleep.yaml -n iperf -
Validate the iPerf client by checking if the pods are running on the worker cluster using the following command:
kubectl get pods -n iperfExpected Output
NAME                           READY   STATUS    RESTARTS   AGE
iperf-sleep-676b945fbf-9l9h7 2/2 Running 0 60s -
Switch context to the worker cluster identified as the server using the following command:
kubectx <cluster name> -
Onboard the existing
iperfnamespace on the slice. To know more, see onboarding namespaces.cautionEnsure that you have onboarded the iperf namespace. If you create a namespace after the slice creation, then you could face issues when you deploy the application as the namespace creation takes some time.
-
Create the
iperf-server.yamlfile using the following template.apiVersion: apps/v1
kind: Deployment
metadata:
name: iperf-server
namespace: iperf
labels:
app: iperf-server
spec:
replicas: 1
selector:
matchLabels:
app: iperf-server
template:
metadata:
labels:
app: iperf-server
spec:
containers:
- name: iperf
image: mlabbe/iperf
imagePullPolicy: Always
args:
- '-s'
- '-p'
- '5201'
ports:
- containerPort: 5201
name: server
- name: sidecar
image: nicolaka/netshoot
imagePullPolicy: IfNotPresent
command: ["/bin/sleep", "3650d"]
securityContext:
capabilities:
add: ["NET_ADMIN"]
allowPrivilegeEscalation: true
privileged: true
---
apiVersion: networking.kubeslice.io/v1beta1
kind: ServiceExport
metadata:
name: iperf-server
namespace: iperf
spec:
slice: <slicename> # water
selector:
matchLabels:
app: iperf-server
ingressEnabled: false
ports:
- name: tcp
containerPort: 5201
protocol: TCP -
Apply the
iperf-server.yamlconfigured in the worker cluster using the following command:kubectl apply -f iperf-server.yaml -n iperf -
Validate the iPerf server by checking if the pods are running on the worker cluster using the following command:
kubectl get pods -n iperf
Expected Output
NAME                            READY   STATUS    RESTARTS   AGE
iperf-server-7889799774-s5zrs   2/2     Running   0          60s
- Validate the service export of the iPerf server on the worker clusters using the following command:
kubectl get serviceexport -n iperf
Expected Output
NAME           SLICE   INGRESS   PORT(S)    ENDPOINTS   STATUS
iperf-server   water             5201/TCP   1           READY
- Validate the service import of the iPerf server on the worker cluster using the following command:
kubectl get serviceimport -n iperf
Expected Output
NAME           SLICE   PORT(S)    ENDPOINTS   STATUS
iperf-server   water   5201/TCP   1           READY
- Validate the service import of the iPerf client on the other worker cluster by running the following command:
kubectl get serviceimport -n iperf
Expected Output
NAME           SLICE   PORT(S)    ENDPOINTS   STATUS
iperf-server   water   5201/TCP   1           READY
-
Switch context to the iperf client cluster using the following command:
kubectx <cluster name> -
Check the connectivity from the iPerf client by using the following command:
kubectl exec -it deploy/iperf-sleep -c iperf -n iperf -- iperf -c iperf-server.iperf.svc.slice.local -p 5201 -i 1 -b 10Mb;Expected Output
------------------------------------------------------------
Client connecting to iperf-server.iperf.svc.slice.local, TCP port 5201
TCP window size: 45.0 KByte (default)
------------------------------------------------------------
[  1] local 10.1.1.5 port 58116 connected with 10.1.2.5 port 5201
[ ID] Interval       Transfer     Bandwidth
[  1] 0.00-1.00 sec   640 KBytes  5.24 Mbits/sec
[  1] 1.00-2.00 sec   640 KBytes  5.24 Mbits/sec
[  1] 2.00-3.00 sec   640 KBytes  5.24 Mbits/sec
[  1] 3.00-4.00 sec   512 KBytes  4.19 Mbits/sec
[  1] 4.00-5.00 sec   640 KBytes  5.24 Mbits/sec
[  1] 5.00-6.00 sec   768 KBytes  6.29 Mbits/sec
[  1] 6.00-7.00 sec   512 KBytes  4.19 Mbits/sec
[  1] 7.00-8.00 sec   512 KBytes  4.19 Mbits/sec
[  1] 8.00-9.00 sec   512 KBytes  4.19 Mbits/sec
[  1] 9.00-10.00 sec   768 KBytes  6.29 Mbits/sec
[  1] 10.00-10.45 sec   384 KBytes  7.04 Mbits/sec
[ 1] 0.00-10.45 sec 6.38 MBytes 5.12 Mbits/secsuccessThe connectivity between the worker clusters on a slice is successful!
Uninstalling KubeSlice
Refer to Uninstalling KubeSlice.


