Install the Tool
Introduction
kubeslice-cli is a command-line tool that allows you to perform KubeSlice operations on Kubernetes clusters. It simplifies the process to install and uninstall the workloads needed to run KubeSlice Controller and Slice Operator in the specified clusters. This tool registers those clusters as part of a KubeSlice multi-cluster, and administer slices across those clusters.
The tool takes input in the form of YAML files that describe the membership of clusters in the multi-cluster (the topology YAML file)
as well as the definition of slices across those clusters (the slice configuration YAML file). Given those YAML files, it simplifies
installation of KubeSlice by performing all of the necessary configuration steps to apply the appropriate config to each cluster.
You can install KubeSlice on your existing kind or cloud clusters.
Alternatively, as a shortcut to create a multicluster of kind clusters to get familiar with KubeSlice, you can use the
kubeslice-cli install —profile option. It will create a demo topology with one controller and two worker clusters.
Install the kubeslice-cli Tool
To install the kubeslice-cli tool on different operating systems, download an executable version from the
Releases page.
Install kubeslice-cli on Windows
To install kubeslice-cli:
-
Download the latest Windows version from the Releases page. After downloading, you can rename the executable file to kubeslice-cli.
-
Navigate to the directory where you have downloaded the executable file or provide the absolute path to run the
kubeslice-clicommand. -
Ensure the downloaded version is the latest using the following command:
.\kubeslice-cli.exe --version
Install kubeslice-cli on Linux
To install kubeslice-cli on Linux or Ubuntu:
-
Download the latest Linux version from the Releases page.
-
Create a symlink to access the file:
infoA symlink is a symbolic Linux/ UNIX link that points to another file or folder on your computer, or a connected file system.
ln -s <downloaded-binary> ~/bin/kubeslice-cli -
Ensure the downloaded version is the latest using the following command:
kubeslice-cli --version
Install kubeslice-cli on macOS
To install kubeslice-cli:
-
Download the latest macOS version from the Releases page.
-
Fix the error. When you try to install kubeslice-cli on macOS, you get the Unverified Developer Error Message. This error message appears when you try to install an application from a developer who is not registered with Apple.
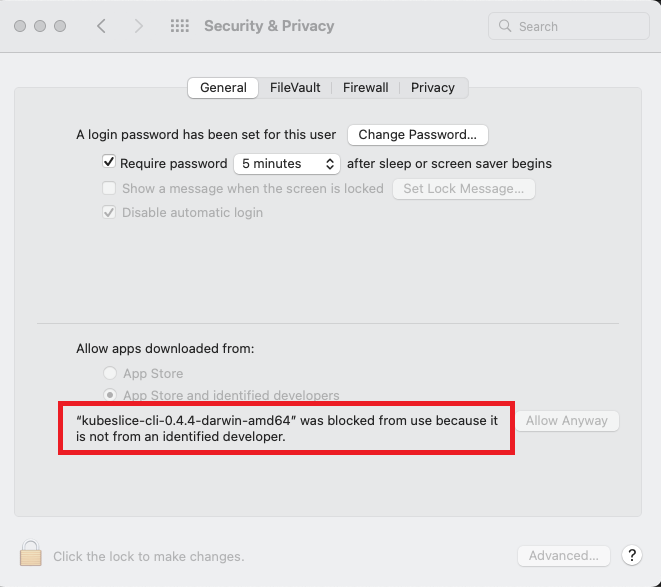
To fix the
Unverified developer error message, follow the instructions in enabling the application for macOS. -
Create a symlink to access the file:
infoA symlink is a symbolic Linux/ UNIX link that points to another file or folder on your computer, or a connected file system.
ln -s <downloaded-binary> ~/bin/kubeslice-cli -
Ensure the downloaded version is the latest using the following command:
kubeslice-cli --version
Download kubeslice-cli using Wget
See the Releases page for the latest version. Use the following command to download the latest binary (~6 MB):
sudo curl -fL https://github.com/kubeslice/kubeslice-cli/releases/download/<latest-version>/kubeslice-cli-<latest-version>-linux-amd64 -o /usr/local/bin/kubeslice-cli
Example
sudo curl -fL https://github.com/kubeslice/kubeslice-cli/releases/download/0.4.2/kubeslice-cli-0.4.2-linux-amd64 -o /usr/local/bin/kubeslice-cli
Make the binary executable using the following command:
sudo chmod a+x /usr/local/bin/kubeslice-cli
Ensure the downloaded version is up-to-date using the following command:
kubeslice-cli -v
kubeslice-cli Commands
This section contains information about KubeSlice commands, syntax, options, a resource type, and a few examples of command usage.
Syntax
Use the following syntax to run the kubeslice-cli tool:
kubeslice-cli [global-options] <command> [<command-arguments>] [command-options]
Commands
The following table describes the syntax and descriptions for all the kubeslice-cli commands.
| Operations | Syntax | Description |
|---|---|---|
| create | kubeslice-cli create [options] | Creates one or more resources from a file. |
| delete | kubeslice-cli delete [options] | Delete resources from a file. |
| describe | kubeslice-cli describe [options] | Describe the KubeSlice resources. |
| edit | kubeslice-cli edit [options] | Edit and update the definition of one or more kubeSlice resources. |
| get | kubeslice-cli get [options] | List one or more kubeSlice resources. |
| install | kubeslice-cli install [options] | Install kubeSlice resources. |
| uninstall | kubeslice-cli uninstall [options] | Uninstall kubeSlice resources. |
| help | kubeslice-cli help | Get more information on any command. |
Options
The following are the kubeslice-cli options.
| Options | Shorthand | Description |
|---|---|---|
| --help | -h | It provides more information on the kubeslice-cli. |
| --config | -c | It is a global option. The path to the topology configuration YAML file. |
| --version | -v | It is the version of the kubeslice-cli tool. |
The kubeslice-cli tool must have access to the clusters you want it to manage. To grant it access, set the KUBECONFIG environment variable to a path to the kubeconfig file containing the necessary keys to access those clusters. To set the KUBECONFIG environment variable, use these commands:
- On Linux/macOS:
export KUBECONFIG=<path to kubeconfig file> - On Windows:
$env:KUBECONFIG = "kubeslice/kubeconfig.yaml"
- If the global —config option is not specified, kubeslice-cli attempts to execute against the current cluster context. Run the
following command to determine which context you are currently in:
kubectx -c. - The currently supported operations are all controller cluster specific. You must run the kubeslice-cli commands on the controller cluster.
use this command to switch the cluster context:
kubectx <controller-cluster>.
create
Use this command to create one or more KubeSlice resources. For example, use the create command to create a slice, project, or service export.
Syntax
kubeslice-cli --config <path-to-the-custom-topology-file> create project <project-name> --namespace <controller-namespace>
kubeslice-cli create <sliceConfig|serviceExportConfig> --namespace <project-namespace> --filename <path-to-the-configuration-yaml>
Options
The following are the kubeslice-cli create options.
| Option | Shorthand | Description |
|---|---|---|
| --filename | -f | It is the filename, directory, or URL of the file used to create the resource. |
| --namespace | -n | It is the name of the project namespace on the KubeSlice Controller. |
| --setWorker | -w | It is the list of worker clusters to be registered in the SliceConfig. |
| --config | -c | It is a global option. The path to the topology configuration YAML file. |
| --help | -h | It provides information on the create command. |
Resource Types
The following are the resource types used with the create command:
- project: It is used to create, edit, delete, describe, and get the project.
- sliceConfig: It is used to create, edit, delete, describe, and get the slice.
- serviceExportConfig: It is used to create, edit, delete, describe, and get the service export.
For more information on resource configuration parameters, see Kubeslice Configuration Parameters.
Examples
The following are the example commands:
-
To create a slice, use the following command:
kubeslice-cli create sliceConfig -n <project-namespace> -f <slice-configuration-yaml>Example
kubeslice-cli create sliceConfig -n kubeslice-avesha -f slice-config.yamlExample output
🏃 Running command: /usr/local/bin/kubectl apply -f slice-config.yaml -n kubeslice-demo
sliceconfig.controller.kubeslice.io/slice-red created

Successfully Applied Slice Configuration. -
To create a project, use the following command:
Kubeslice-cli create project <project-namespace> -n <controller-namespace>Example
kubeslice-cli create project kubeslice-avesha -n kubeslice-controllerExample Output
Creating KubeSlice Project...
✔ Generated project manifest project.yaml
🏃 Running command: /usr/local/bin/kubectl apply -f kubeslice/project.yaml -n kubeslice-controller
✔ Applied project.yaml
Created KubeSlice Project. -
To create service export, use the following command:
kubeslice-cli create serviceExportConfig -f <path-to-the-service-export-yaml> -n <application-namespace>
delete
Use this command to delete the KubeSlice resources. For example, use the delete command to delete a slice, project, or service export. The delete command can also be used to unregister the registered worker cluster. You must offboard the namespaces and delete the slice before unregistering the worker cluster. For more information, see Uninstalling KubeSlice.
Syntax
kubeslice-cli <delete|remove|d> project <project-name> --namespace <controller-namespace>
kubeslice-cli <delete|remove|d> <sliceConfig|serviceExportConfig> <resource-name> --namespace <project-namespace>
Options
The following are the kubeslice-cli delete command options.
| Name | Shorthand | Usage |
|---|---|---|
| --namespace | -n | It is the name of the project namespace on the KubeSlice Controller. |
| --config | -c | It is a global option. The path to the topology configuration YAML file. |
| --help | -h | It provides information on the delete command. |
Resource Types
The following are the resource types used with the create command:
- project: It is used to create, edit, delete, describe, and get the project.
- sliceConfig: It is used to create, edit, delete, describe, and get the slice.
- serviceExportConfig: It is used to create, edit, delete, describe, and get the service export.
For more information on resource configuration parameters, see Kubeslice Configuration Parameters
Examples
The following are the example commands:
-
To delete the slice configuration, use the following command:
kubeslice-cli delete sliceConfig <sliceConfig-name> -n <project namespace>Example
kubeslice-cli delete sliceConfig blue -n kubeslice-demoExample Output
Deleting KubeSlice SliceConfig...
🏃 Running command: /usr/local/bin/kubectl delete sliceconfigs.controller.kubeslice.io blue -n kubeslice-demo
sliceconfig.controller.kubeslice.io "blue" deleted -
To delete a project, use the following command:
kubeslice-cli delete project <project-name> -n <controller-namespace>Example
kubeslice-cli delete project rainbow -n kubeslice-controllerExample Output
Deleting KubeSlice Project...
🏃 Running command: /usr/local/bin/kubectl delete projects.controller.kubeslice.io uma -n kubeslice-controller
project.controller.kubeslice.io "rainbow" deleted -
To delete a registered worker cluster, use the following command:
kubeslice-cli delete worker <worker-name> -n <project-namespace>Example:
kubeslice-cli delete worker kind-ks-w-4 -n kubeslice-demoExample Output
Deleting KubeSlice Worker...
🏃 Running command: /usr/local/bin/kubectl delete clusters.controller.kubeslice.io kind-ks-w-4 -n kubeslice-demo
cluster.controller.kubeslice.io "kind-ks-w-4" deleted
describe
Use this command to describe KubeSlice resources. This shows the details of a specific KubeSlice resource.
Syntax
kubeslice-cli describe project <project-name> --namespace <controller-namespace>
kubeslice-cli describe <sliceConfig|serviceExportConfig> --namespace <project-namespace>
Options
The following are the kubeslice-cli describe command options.
| Option | Shorthand | Description |
|---|---|---|
| --namespace | -n | It is the name of the project namespace on the KubeSlice Controller. |
| --config | -c | It is a global option. The path to the topology configuration YAML file. |
| --help | -h | It provides information on the describe command. |
Resource Types
The following are the resource types used with the describe command:
- project: It is used to create, edit, delete, describe, and get the project.
- sliceConfig: It is used to create, edit, delete, describe, and get the slice.
- serviceExportConfig: It is used to create, edit, delete, describe, and get the service export.
For more information on resource configuration parameters, see Kubeslice Configuration Parameters.
Examples
The following are the example commands:
-
To describe the slice configuration, use the following command:
kubeslice-cli describe sliceConfig <slice-name> -n <project-namespace>Example
kubeslice-cli describe sliceConfig slice-red -n kubeslice-demoExample Output
Describing KubeSlice SliceConfig...
🏃 Running command: /usr/local/bin/kubectl describe sliceconfigs.controller.kubeslice.io slice-red -n kubeslice-demo
Name:         slice-red
Namespace:    kubeslice-demo
Labels:       <none>
Annotations:  <none>
API Version:  controller.kubeslice.io/v1alpha1
Kind:         SliceConfig
Metadata:
  Creation Timestamp:  2022-10-04T12:35:54Z
  Finalizers:
    controller.kubeslice.io/slice-configuration-finalizer
  Generation:  1
  Managed Fields:
    API Version:  controller.kubeslice.io/v1alpha1
    Fields Type:  FieldsV1
    fieldsV1:
      f:metadata:
        f:annotations:
           .:
          f:kubectl.kubernetes.io/last-applied-configuration:
      f:spec:
         .:
         f:clusters:
         f:qosProfileDetails:
           .:
          f:bandwidthCeilingKbps:
          f:bandwidthGuaranteedKbps:
          f:dscpClass:
          f:priority:
          f:queueType:
          f:tcType:
        f:sliceGatewayProvider:
           .:
           f:sliceCaType:
           f:sliceGatewayType:
         f:sliceIpamType:
        f:sliceSubnet:
        f:sliceType:
    Manager:      kubectl-client-side-apply
    Operation:    Update
    Time:         2022-10-04T12:35:54Z
    API Version:  controller.kubeslice.io/v1alpha1
    Fields Type:  FieldsV1
    fieldsV1:
      f:metadata:
        f:finalizers:
          .:
          v:"controller.kubeslice.io/slice-configuration-finalizer":
    Manager:         manager
    Operation:       Update
    Time:            2022-10-04T12:35:54Z
  Resource Version:  60976
  UID:               d7fa839e-9b05-4264-adc6-a061850d54d5
Spec:
  Clusters:
    ks-w-1
    ks-w-2
  Namespace Isolation Profile:
    Isolation Enabled:  false
  Qos Profile Details:
    Bandwidth Ceiling Kbps:     30000
    Bandwidth Guaranteed Kbps:  20000
    Dscp Class:                 AF11
    Priority:                   0
    Queue Type:                 HTB
    Tc Type:                    BANDWIDTH_CONTROL
  Slice Gateway Provider:
    Slice Ca Type:       Local
    Slice Gateway Type:  OpenVPN
  Slice Ipam Type:       Local
  Slice Subnet:          10.190.0.0/16
  Slice Type:            Application
Events:                  <none>
edit
Use this command to directly edit any KubeSlice resource you can retrieve through the command line tools. It opens the
editor defined by your KUBE_EDITOR, or EDITOR environment variables, or falls back to vi for Linux or notepad for Windows.
You can edit multiple objects, although changes are applied one at a time. The command accepts filenames as well as command line arguments,
although the files you point to must be previously saved versions of resources. The default format is YAML. In the event of an error
while updating, a temporary file is created on disk that contains your unapplied changes. The most common error when updating a
resource is another editor changing the resource on the server. When this occurs, apply your changes to the newer version
of the resource, or update your temporary saved copy to include the latest resource version.
Syntax
kubeslice-cli <edit|e> project <project-name> --namespace <controller-namespace>
kubeslice-cli <edit|e> <sliceConfig|serviceExportConfig> <resource-name> --namespace <project-namespace>
Options
The following are the kubeslice-cli edit command options.
| Option | Shorthand | Description |
|---|---|---|
| --namespace | -n | It is the name of the project namespace on the KubeSlice Controller. |
| --filename | -f | It is the filename, directory, or URL of the file used to create the resource. |
| --config | -c | It is a global option. The path to the topology configuration YAML file. |
| --help | -h | It provides information on the edit command. |
Resource Types
The following are the resource types used with create command:
- project: It is used to create, edit, delete, describe, and get the project.
- sliceConfig: It is used to create, edit, delete, describe, and get the slice.
- serviceExportConfig: It is used to create, edit, delete, describe, and get the service export.
For more information on resource configuration parameters, see Kubeslice Configuration Parameters.
Examples
The following are the example commands:
- To edit the slice configuration, use the following command:
Example
kubeslice-cli edit sliceConfig <slice-name> -n <project-namespace>kubeslice-cli edit sliceConfig blue -n kubeslice-demo - To edit the project details, use the following command:
Examples
kubeslice-cli edit project <project name> -n <controller-namespace>kubeslice-cli edit project demo -n kubeslice-controller
kubeslice-cli edit project kubeslice-avesha -n kubeslice-controller - To edit the service export, use the following command:
The
kubeslice-cli edit serviceExportConfig <resource-name> --namespace <project namespace><resource-name>is obtained using this command:Examplekubeslice-cli get serviceExportConfig -n <project namespace>Example Outputkubeslice-cli get serviceExportConfig -n kubeslice-demoExampleFetching KubeSlice serviceExportConfig...
🏃 Running command: /home/eric/bin/kubectl get serviceexportconfigs.controller.kubeslice.io -n kubeslice-demo
NAME AGE
iperf-server-iperf-worker-2 4d19hkubeslice-cli edit serviceExportConfig iperf-server-iperf-worker-2 -n kubeslice-demo
get
Use this command to get one or more KubeSlice resources. For example, use the get command to get a slice, project, or service export.
Syntax
kubeslice-cli <get|g> project <project-name> --namespace <controller-namespace>
kubeslice-cli <get|g> <sliceConfig|serviceExportConfig> --namespace <project-namespace>
Options
The following are the kubeslice-cli get command options.
| Option | Shorthand | Description |
|---|---|---|
| --namespace | -n | It is the name of the project namespace on the KubeSlice Controller. |
| --output | -o | It supports json and yaml values. |
| --worker | -w | It is the worker cluster name. |
| --config | -c | It is a global option. The path to the topology configuration YAML file. |
| --help | -h | It provides information on the get command. |
Resource Types
The following are the resource types used with the get command:
- project: It is used to create, edit, delete, describe, and get the project.
- sliceConfig: It is used to create, edit, delete, describe, and get the slice.
- serviceExportConfig: It is used to create, edit, delete, describe, and get the service export.
- secrets: It is used to get the secrets of the registered worker clusters from the controller cluster.
For more information on resource configuration parameters, see Kubeslice Configuration Parameters.
Examples
The following are the example commands:
-
To get the worker details, use the following command:
kubeslice-cli get worker -n <project-namespace>Example
kubeslice-cli get worker -n kubeslice-demoExample Output
Fetching KubeSlice Worker...
🏃 Running command: /usr/local/bin/kubectl get clusters.controller.kubeslice.io -n kubeslice-demo
NAME     AGE
ks-w-1   8m13s
ks-w-2 8m13s -
To get a slice, use the following command:
kubeslice-cli get sliceConfig -n <project-namespace>Example
kubeslice-cli get sliceConfig -n kubeslice-demoExample Output:
Fetching KubeSlice sliceConfig...
🏃 Running command: /usr/local/bin/kubectl get sliceconfigs.controller.kubeslice.io -n kubeslice-demo
NAME   AGE
blue 27s -
To get the project details, use the following command:
kubeslice-cli get project -n <controller-namespace>Example
kubeslice-cli get project -n kubeslice-controllerExample Output
Fetching KubeSlice Project...
🏃 Running command: /usr/local/bin/kubectl get projects.controller.kubeslice.io -n kubeslice-controller
NAME   AGE
demo 7m6s -
To get the list of secrets that belong to project namespace, use the following command:
kubeslice-cli get secrets <worker-cluster-name> -n kubeslice-demoExample 1
kubeslice-cli get secrets -n kubeslice-demoExample Output
Fetching KubeSlice secret...
🏃 Running command: /usr/local/bin/kubectl get secrets -n kubeslice-demo
NAME                                       TYPE                                  DATA   AGE
default-token-6qz9w                        kubernetes.io/service-account-token   3      73m
demo-ks-w-1-ks-w-2                         Opaque                                7      69m
demo-ks-w-2-ks-w-1                         Opaque                                1      69m
kubeslice-rbac-rw-john-token-smmfj         kubernetes.io/service-account-token   3      73m
kubeslice-rbac-worker-ks-w-1-token-rn7dl   kubernetes.io/service-account-token   5      73m
kubeslice-rbac-worker-ks-w-2-token-qld6t   kubernetes.io/service-account-token   5      73m
Example 2
Use the following command to get the details of secrets in the yaml file.
kubeslice-cli get secrets -n kubeslice-demo -o yaml -
To get the service export, use the following command:
kubeslice-cli get serviceExportConfig -n <project-namespace>Example
kubeslice-cli get serviceExportConfig -n kubeslice-demoExample Output
Fetching KubeSlice serviceExportConfig...
🏃 Running command: /usr/local/bin/kubectl get serviceexportconfigs.controller.kubeslice.io -n kubeslice-demo
NAME                          AGE
iperf-server-iperf-worker-2   4d19h
install
Use this command to install the required workloads to run KubeSlice Controller and worker clusters.
Syntax
kubeslice-cli --config <path-to-the-custom-topology-file> <install|i>
kubeslice-cli install <command-options>
kubeslice-cli install --profile=<minimal-demo|full-demo>
Options
The following are the kubeslice-cli install command options.
| Option | Shorthand | Description | Supported Values |
|---|---|---|---|
| --profile | -p | It is the profile to install or uninstall KubeSlice. | full-demo: showcases the KubeSlice inter-cluster connectivity by spawning 3 kind clusters, including 1 KubeSlice Controller and 2 worker clusters, and installing iPerf application to generate network traffic. minimal-demo: sets up 3 kind clusters, including 1 KubeSlice Controller and 2 worker clusters. Generates the Kubernetes manifests for user to manually apply, and verify the functionality. |
| --skip | -s | It skips the installation steps (comma-separated) with minimal-demo and full-demo options. | kind: skips the creation of kind clusters. calico: skips the installation of Calico. controller: skips the installation of KubeSlice Controller. worker-registration: skips the registration of worker clusters with the KubeSlice Controller. worker: skips the installation of worker clusters. demo: skips the installation of additional example applications. |
| --config | -c | It is a global option. The path to the topology configuration YAML file. | |
| --help | -h | It provides information on the install command. |
The global option --config and install command option --profile are mutually exclusive and cannot be used together.
Examples
The following are the example commands:
-
Use the following command to create the kind clusters, install the KubeSlice Controller and worker clusters.
kubectl-cli install --profile=minimal-demo -
To install the KubeSlice using custom topology file, use the following command:
kubeslice-cli --config <path-to-the-custom-topology-file> install
register
Use this command to register a new worker cluster with the KubeSlice Controller in an existing multi-cluster setup.
Syntax
kubeslice-cli register worker <worker-cluster-name> --namespace <project-namespace>
kubeslice-cli --config <path-to-the-custom-topology-file> <install|i> [options]
Options
The following are the kubeslice-cli register command options.
| Option | Shorthand | Description |
|---|---|---|
| --filename | -f | It is the filename, directory, or URL of the file used to create the resource. |
| --namespace | -n | It is the name of the project namespace on the KubeSlice Controller. |
| --config | -c | It is a global option. The path to the topology configuration YAML file. |
| --help | -h | It provides information on the register command. |
Resource Type
The worker is the resource type used with the register command.
For more information on resource configuration parameters, see Kubeslice Configuration Parameters.
Examples
The following are the example commands:
You must switch the context to the controller cluster to register the worker cluster.
-
To register a new worker cluster with the KubeSlice Controller in demo setup, use the following command:
kubeslice-cli register worker <worker-cluster-name> -n kubeslice-demoExample
kubeslice-cli register worker kind-ks-w-4 -n kubeslice-demoExample Output
Registering Worker Clusters with Project...
✔ Generated cluster registration manifest kubeslice/custom-cluster-registration.yaml
🏃 Running command: /usr/local/bin/kubectl apply -f kubeslice/custom-cluster-registration.yaml -n kubeslice-demo
✔ Applied kubeslice/custom-cluster-registration.yaml
Registered Worker Clusters with Project. -
To register a new worker cluster with the KubeSlice Controller in an existing multi-cluster setup, use the following command:
infoAdd a new worker information in the same custom topology file that you used to install KubeSlice. The -s controller option skips the installation of KubeSlice Controller.
kubeslice-cli --config=<path-to-the-custom-topology-file> install -s controller
uninstall
Use this command to uninstall all the KubeSlice components on kind and cloud clusters.
Syntax�
kubeslice-cli <uninstall|cleanup>
Options
The following are the kubeslice-cli uninstall options
| Option | Shorthand | Description |
|---|---|---|
| --config | -c | It is a global option. The path to the topology configuration YAML file. |
| --help | -h | It provides information on the delete command. |
| --all | -a | Uninstalls all the KubeSlice components (worker, controller, and Kubeslice Manager). |
| --ui | -u | Uninstalls the enterprise user interface component (Kubeslice Manager). |
Examples
The following is an example command:
-
To uninstall the KubeSlice components on kind clusters and delete the kind clusters created using
full-demo|minimal-demooption, use the following command:kubeslice-cli uninstall -
To uninstall the KubeSlice components that were installed using a custom topology file on cloud clusters, use the following command:
infoKubeSlice must be uninstalled using the topology file that was used to install it on cloud clusters.
kubeslice-cli uninstall --config=<path-to-the-custom-topology-file> --all


